Elavon customer service: 0345 850 0195 Opayo product support: 0191 313 0299
For support in Ireland, click here
Elavon Customer Service:
0345 850 0195
Opayo Product Support:
0191 313 0299
If you are using either the server or direct integration method for your transactions you will need to enter a valid IP address into your MyOpayo admin panel.
This is so our systems will know which IP address to accept transaction posts from and allow payments to be made through your account.
Before you can add any IP addresses to your account you will first need to login to your MyOpayo admin panel as a user with administrative rights.
You can login to either test MyOpayo or live MyOpayo to add your IP addresses.
Any IP addresses that are added onto your test account will not be carried over to your live account. Also any IP addresses added to live will not transfer over to test.
If you would like to add an IP address to both test and live you will need to log into each MyOpayo and enter the IP address manually.
Now that you have logged into your MyOpayo you are ready to add your IP address.
The first thing you will need to do is select the settings section from the menu at the top of the page.
Once you have done this you will see a list of options presented down the left hand panel of the screen. Select valid IPs from the list and you will be taken to the IP page.
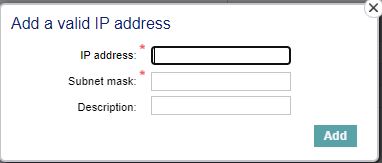
You can then select the add button to enter the IP address you would like to add to your account.
When adding an IP address, it is important to remember that our systems require each IP address to consist of 12 numbers.
This is to be entered into your MyOpayo as 4 banks of 3 numbers separated by a decimal point.
000.000.000.000
If the IP address you are adding to your account is not in this format you will need to “pad this out”. Padding out an IP address takes the address you have – regardless of length, and increases it to match the 3 by 4 banks format we require.
To do this you would simply add a 0 to the beginning of any bank of numbers that is less than 3 until you have a full IP address.
A few examples of this would be:
Your IP Address
12.123.23.123
1.12.123.3
123.123.123.12
Padded IP Address
012.123.023.123
001.012.123.003
123.123.123.012
By adding 0’s to your IP you are not changing the address that is being used, you are simply formatting it to be accepted by the Opayo system.
When you add an IP address to your Opayo account you will also need to enter a subnet mask.
The subnet mask tells the Opayo systems what to accept when a post is received from your IP address.
If for example you enter an IP address of 123.123.123.123 with a subnet mask of 255.255.255.000 the Opayo systems will accept transaction posts from any IP address beginning with 123.123.123.
But if you enter the subnet mask as 255.255.255.255 our systems will only accept transactions that are posted from the exact IP address you have entered.
The subnet mask allows you to enter a single IP address into your MyOpayo that will cover a set range of IP addresses on your system.
The Opayo system will only accept class C subnet masks.
Each user in your MyOpayo has the option to enter their email address.
They will then be able to receive updates from us, and also allow them to reset their own passwords if they cannot access MyOpayo.
You can do this by either:
When creating a user you will be able to enter an email for the user, to see how to create a user please check out our article.
In order to add your email address to your user you will first need to log into the account.
Before you can make any changes to the users on your account you must first sign into MyOpayo as a user with administrative rights.
Once logged into your account, select the settings tab, followed by users. You will then be taken to the user administration screen where you can remove the relevant username that is no longer required.
Select the user that you would like to remove and choose the delete option from the bottom of the screen, you will need to confirm your action before this is completed. This will delete this user from your account instantly.
The status of your account will determine which MyOpayo area you will need to access.
If your account is processing transactions and fully functional on your website you will log into live MyOpayo.
If however, your account is still in testing, or your website is still undergoing development and integration you will log into the test MyOpayo area.
The login pages for each MyOpayo are;
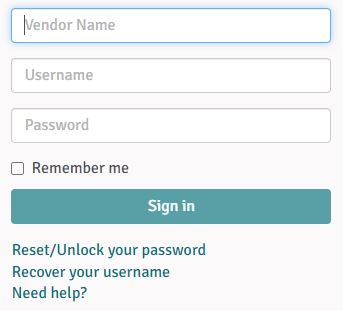
Once you have reached the login page for your account you will be asked to enter your credentials.
You will be required to enter these credentials each time you want to log into your account.
Once you have entered all of the information simply click sign in to be taken into your MyOpayo.
When logging into your account there are a few things to remember:
Your MyOpayo area allows you to create users to grant access to others on your account.
In order to create a user you must first log into the account as a user with administrative rights.
This can either be the main administrative user that is set-up as standard with your account, or a user you have previously created.
The privileges you set your users will depend on what you have enabled on your account with us.
There are 7 options as to what you can allow the users on your account to do. Depending on the user, you will be able to either grant or restrict certain actions on your account.
You can set users to process transactions and refunds.
The privileges are centred on the transactions processed through your account, and any actions that can be taken against these.
You will then be able to grant the user rights to view parts of your MyOpayo area. From viewing transactions, processing through the terminal, to granting administration rights on the account.
Each box you select for the user will allow them to access a specific part of your MyOpayo.
After you have granted the user privileges and permissions you can then set the page they will first see when logging into your account.
The page you would like the user to land on must first have been enabled in MyOpayo access.
Once you are happy with the new user simply click add user and this will add the new user to your account.
Before you can unlock a user you must first log into the account.
To unlock any user, you must be signed in as another user with administrative rights.
The first thing you need to do to change the passwords for a user is to log into your MyOpayo account as a user with administrative rights.
You can do this by going to the live MyOpayo login page.
Once you have logged into the account, you simply need to select the settings tab, followed by users. You will then be taken to the main user page where you can change the password for the user.
All you need to do is select the user you would like to amend and change the password the user has.
Please ensure that the password meets the requirements highlighted in the text box below the password strength indicator.
If your password does not meet the requirements you will not be able to change the password.
Once you are happy with the changes to the user simply click update to be taken back to the users screen.
If you do not wish to know the password the user has to log into your account we would advise have the user create, and enter the new password themselves into MyOpayo.
The first thing you need to do to change the privileges for a user is to log into your MyOpayo account as a user with administrative rights.
You can do this by going to the live MyOpayo login page.
Once you have logged into the account, you simply need to select the settings tab, followed by users. You will then be taken to the main user page where you can change the privileges for the user.
All you need to do is select the user you would like to amend and change the privileges the user has.
You are able to change the actions the user can take by selecting, or de-selecting the tick boxes within the account privileges frame.
You can also limit the pages the user has the ability to view by amending the MyOpayo access frame.
Once you are happy with the changes to the user simply click update to be taken back to the users screen.
(Sole trader, or partnership with 3 or less partners)
(All other customers)
(Multi-national customers)
(Opayo gateway only)