Once you have opened your accounts software you will first need to click on the help option, followed by about.
After opening the about page you will need to select data directory to launch the correct folder.
Once you have loaded the folder you will need to select the up folder button which can be found beneath the favourites option on the screen.
You will now need to select the layouts folder and paste your new layout into this destination.
Search our help centre
Sage business cloud
Customer Centre
Now that you have placed your new layout into the correct folder you will be able to view this by selecting modules, followed by the Invoicing option.
Simply double click on an invoice and select the print option.
You are then able to select the layouts tab from the left hand column and scroll until you locate your new invoice template that you would like to use.
Process an invoice payment transaction
If your Opayo account has the ability to process ecommerce transactions you will be able to process an invoice payments transaction through your Sage Business Cloud Accounting. Any invoice that is sent to a customer will include a pay now button that will allow your customers to pay the balance.
Once a customer has processed their transaction the invoice will be automatically updated as paid and the funds will be recorded in the bank account that has been chosen for your Opayo transactions.
The payment will then appear in the customers activity within Sage Business Cloud Accounting.
Before your customer can process their transaction you will first need to create or locate the invoice to be sent to your customer.
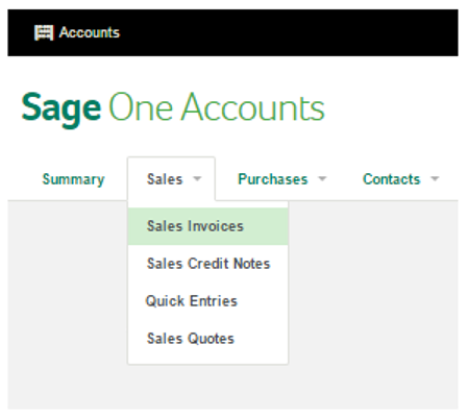
To do this you will first need to go to sales > sales invoices.
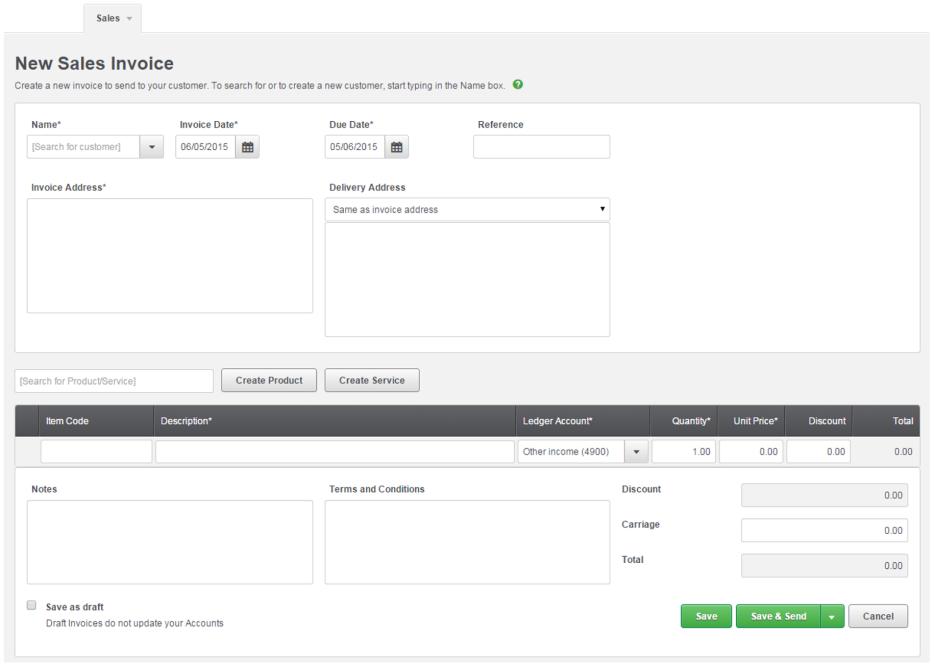
You are then able to select new invoice and enter the details of your customer and the goods that they have purchased.
Once the invoice has been completed you will then have 2 options – save or save & send.
Save will simply store the invoice in your Sage Business Cloud Accounting ready to be sent or cleared, while save & send will store a copy of the invoice and email a copy out to your customer which they can then use to make a payment.
If you already have an invoiced saved you are able to simply send this off to your customer without having to make any changes.
Firstly, you will need to locate and open the invoice within your Sage Business Cloud Accounting.
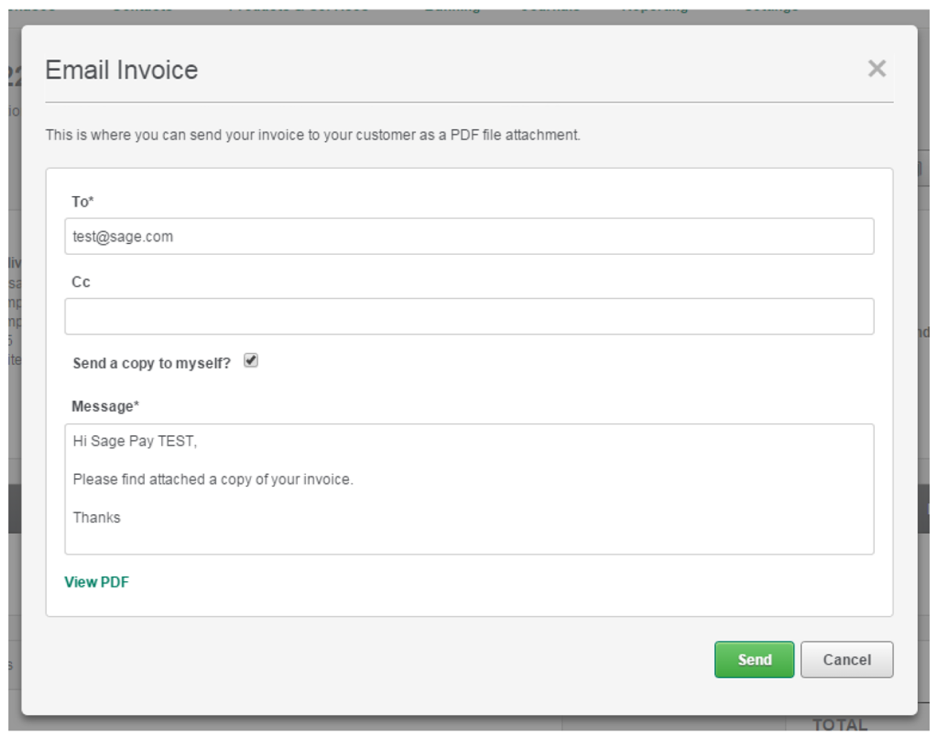
You can then select email to send the invoice to your customer.
A screen will appear where you can enter the email address of the customer you would like to send the invoice too. There is also the option to send a copy of the email and invoice to yourself. Finally you have the option to add a message to the email for your customer.
The email with the invoice will then be sent to your customer so they can process a transaction.
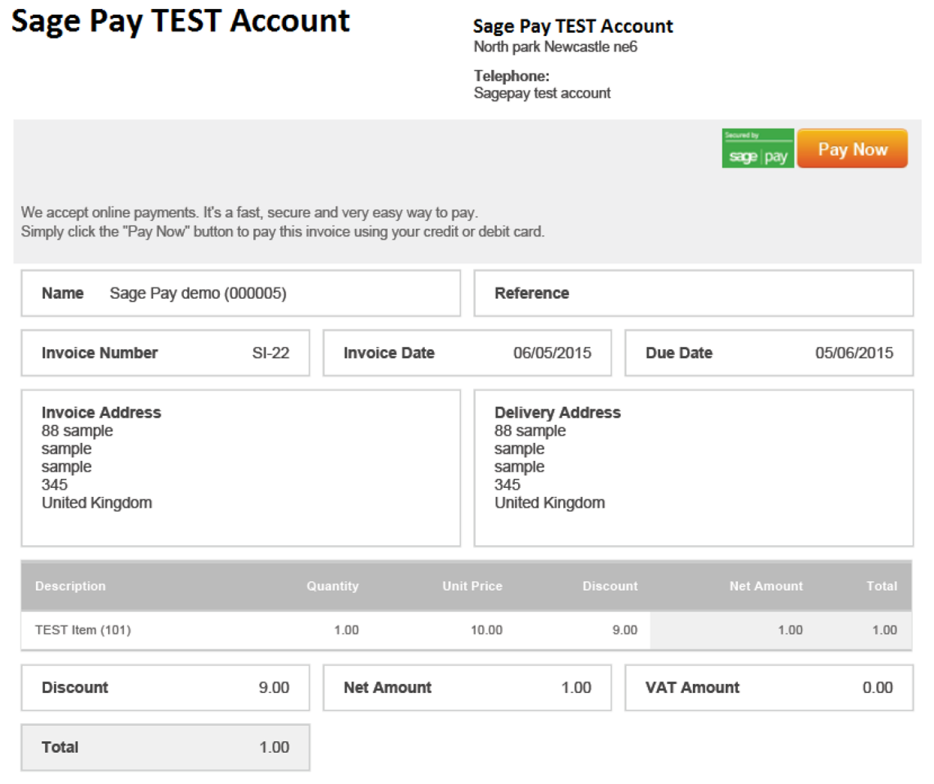
Once the email has been received your customer will be able to open the invoice and process a transaction.
At the top of the invoice there is a pay now button that can be clicked by your customer.
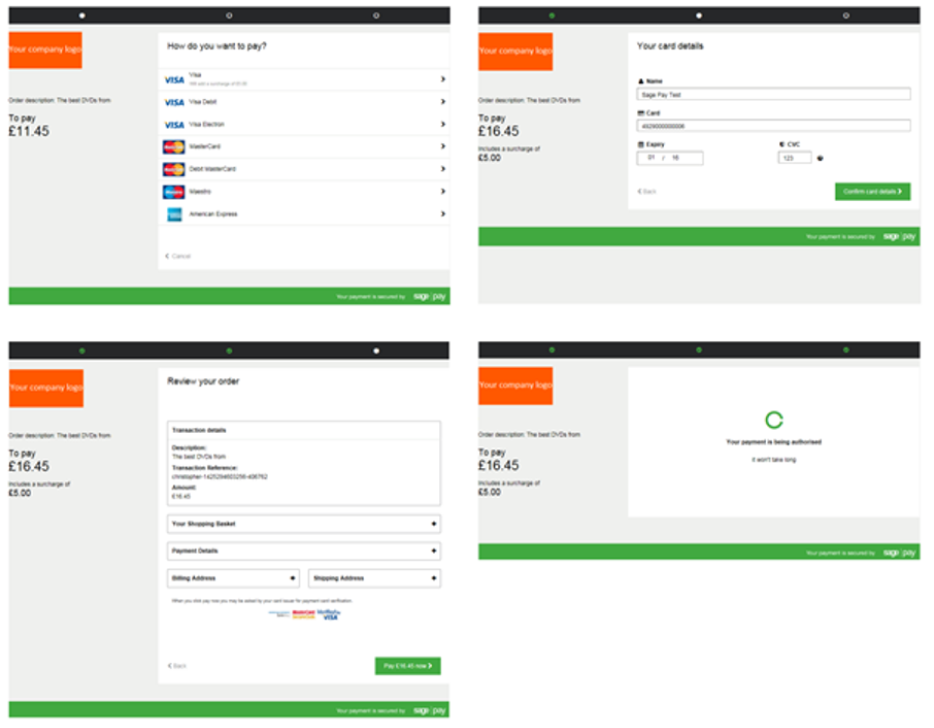
Once clicked, a web browser will open on the screen with the Opayo payment pages where the customer can enter their card details and complete the transaction.
A message will then appear advising your customer that the transaction has been completed and the invoice will then be marked as paid within your Sage Business Cloud Accounting.
Items not deducting from your stock
If when you are downloading transactions from your Opayo account into your Sage 50c Accounts your stock and products are not being referenced correctly this will be due to the product codes not being referenced correctly within your basket contents.
When using the MyOpayo download wizard to import transactions into your accounts software you are able to reference product codes that you have created within your Sage 50c Accounts to manage your stock more effectively.
When creating a stock item or service code in your accounts software you will be required to create a product code for the item.
The product code is a reference that is used to relate to the item your shopper is purchasing and allows you to see the reference when the order is placed.
You are also able to apply this to the items on your web store so, when the MyOpayo download wizard is ran on your accounts software will be able to reference the item that has been purchased and deduct this from your stock lists.
For more information please contact Sage support.
Once you have created your product codes in your Sage 50c Accounts software you will be able to include these on the items on your website.
In order to apply these product codes to items on your website you will need to speak with your web developer who will be able to help you with this.
After the codes have been applied to your items when the transaction is placed the product code will then be included in the basket field that is passed with your transaction.
When passing the basket field through with any order on your site, the field is populated with 6 columns.
- Items – A description of the item that has been purchased. The product code will be included here.
- Quantity – The volume of the product that have been ordered.
- Item value – The amount for each individual item ordered.
- Item tax – The tax that is applied to each individual item.
- Item total – The total cost of the item plus tax.
- Line total – The overall cost of the items plus tax in each line of the basket.
The basket contents can then be used to reference stock on your Sage 50c Accounts product.
A common basket field will be displayed as:
As you can see there are no product codes referenced within the basket that is passed for this transaction.
By including your product code in the Items column your accounts software will be able to reference and deduct this from the stock levels on your account.
To include the product code in your basket field you will need to enter this at the beginning of the Item column and in enclosed [ ] square brackets.
If you use other brackets this will not work correctly and not deduct from your stock.
By including the product code into your basket it will then appear as:
When downloading the transaction using the MyOpayo download wizard your software will then be able to deduct the items from the correct stock.
When passing the basket field through with the transaction your basket will now be passed as:
4 : [PROD0001] Product 1 : 1 : 424.00 : 74.32 : 499.00 : 499.00 : [PROD0002] Product 2 : 3 : 11.91 : 2.08 : 13.99 : 41.97 : [PROD0003] Product 3 : 2 : 11.05 : 1.94 : 12.99 : 25.98 : Delivery : 1 : 0.00 : 0.00 : 0.00 : 4.99
The product codes will then be used in line with those in your accounts software.
Delivery charge in your basket
If you would like your Sage 50c Accounts software to recognise and use the delivery charge on your order you must include this into the basket field that is used for the order on your account.
When using the download wizard your software will use the basket field to identify products and charges that have been used to build the order.
The delivery charge, although not stock can be included to reflect the right amount in the basket for the charge of the transaction.
When passing the basket field through with any order on your site, the field is populated with 6 columns.
- Items – A description of the item that has been purchased.
- Quantity – The volume of the product that have been ordered.
- Item value – The amount for each individual item ordered.
- Item tax – The tax that is applied to each individual item.
- Item total – The total cost of the item plus tax.
- Line total – The overall cost of the items plus tax in each line of the basket.
The basket contents can then be used to reference stock on your Sage 50c Accounts product.
A common basket field will be displayed as:
This will be represented in the transactional post to the Opayo systems as:
4: Product 1 : 1 : 424.68 : 74.32 : 499.00 : 499.00 : Product 2 : 3 : 11.91 : 2.08 : 13.99 : 41.97 : Product 3 : 2 : 11.05 : 1.94 : 12.99 : 25.98 : Delivery : 1 : 0.00 : 0.00 : 0.00 : 4.99
As you can see each column within the basket field that is being passed through with the transaction is separated by a colon.
If you would like to leave any of the columns blank when passing the basket field you will still need to include the colon. A basket field with a blank column will look like this:
Delivery : 1 : 4.99 : : : 4.99
This is a line of a basket that has no content for the Item tax and item total columns.
If this was used on a transaction that was downloaded into your Sage 50c Accounts software it will be classified as an S2 – VAT excluded item.
In order to pull through the charge for delivery you have applied you will need to make sure that you populate all of the fields that are included in the basket field.
You are also able to create a “non-stock or service” item within your Sage 50c Accounts for the delivery charge. This will then allow your system to identify a delivery charge as a service and record it accordingly.
If you would like to know how to create products and services in your accounts software check out our article.
The delivery charge will then be downloaded into your Sage 50c Accounts product.
When populating the delivery charges you will need to decide whether or not to apply tax to the charge.
If you do not want to apply tax to the charge you will simply need to pass the basket without the Item Tax column having any content.
For tax to be included you will just need to include the tax amount that is to be applied to the delivery charge.
Your Sage 50c software will then be able to classify the delivery as either an S1 – VAT included or S2 – VAT excluded product.
To include the product code in your basket field you will need to enter this at the beginning of the Item column and in enclosed [ ] square brackets.
If you use other brackets this will not work correctly and not deduct from your stock.
By including the product code into your basket it will then appear as:
When downloading the transaction using the MyOpayo download wizard your software will then be able to deduct the items from the correct stock.
When passing the basket field through with the transaction your basket will now be passed as:
4 : [PROD0001] Product 1 : 1 : 424.00 : 74.32 : 499.00 : 499.00 : [PROD0002] Product 2 : 3 : 11.91 : 2.08 : 13.99 : 41.97 : [PROD0003] Product 3 : 2 : 11.05 : 1.94 : 12.99 : 25.98 : Delivery : 1 : 0.00 : 0.00 : 0.00 : 4.99
The product codes will then be used in line with those in your accounts software.
Before activating Opayo you must first log into your Sage Instant Accounts as a user with administrative rights.
This can be either a user you have created, or the manager on the software.
Once logged in, you will then need to click on settings, followed by company preferences.
After selecting company preferences, followed by Opayo you will be able to enter the details of your account into Sage Instant.
You will be prompted to enter your:
- Vendor name – of your Opayo account
- Username – this is the name of a user from your MyOpayo
- Password – the password of the username from your MyOpayo
- Email address – your own email address
Important – When entering a username into your Sage Instant Accounts we would advise that you have created a user within your MyOpayo to be used specifically with your Sage Instant.
After you have entered the details of your Opayo account you will then need to select the bank details for the funds from your e-invoice’s to be allocated too.
Tip – When selecting the bank account please remember to do this carefully, you may find it worthwhile to create a specific bank account for your e-invoice transactions. On a day to day basis you may have a large number of e-invoice transactions that are later transferred into your bank account as a collective value. This will allow you to match the values easier.
You are also able to choose if you would like your Sage Instant Accounts to check for payments each time you open the software, and you can force your Sage Instant to request you enter your password each time.
Your Sage Instant will not automatically download the transactions for you, it will simply take you to the download wizard ready to import the transactions into your Sage Instant accounts software.
Practice data is information that is used with your Sage 50c Accounts product that allows you to test the invoice payments feature without using your own company data.
This will allow you to test the process, the invoice payments, and the reconciliation of these payments without interfering with your live accounts.
When you first load up your Sage 50c Accounts product you will be given a list of options to choose from.
You are then able to select practice data to start the program.
Now that you have loaded up the practice data you will be able to test your e-invoices, and mail order payments without disrupting your live accountancy data.
You will then need to link your practice data to your Opayo account.
Firstly, we advise that you change back to the default invoices that are available within your Sage Accounts product and perform a test to ensure the connection can be established.
If the test is unsuccessful the issue will be related to the customised invoices that you have in place on your accounts software, and will need to be addressed.
We are able to help you with this, if the issue lies with your custom invoices simply provide us with a copy of the invoice template you are using and we will be able to help you trouble shoot this further.
You will be able to locate the invoice layout you are using by selecting:
Help > about > program > data directory > select the up folder button > layouts
You will then able to locate the layout and submit it in a support request to Sage support.
Currencies with your merchant number
The currencies that you can accept on your Opayo account will depend on your merchant bank. The merchant number that you have been issued with will define the currencies that can be accepted on your account with us.
If you would like to accept multiple currencies you must first speak with your merchant bank.
Your merchant bank will either issue you with additional merchant numbers to support the additional currencies you are able to accept, or confirm the currencies your current merchant number is able to accept.
You will then be able to supply the new merchant number through to us following the merchant number addition process or confirm to us via e-mail of the currencies that can be accepted on your current merchant number.
If you want to know more, check out our merchant banks and Opayo page.
A chargeback is a claim from a shopper’s card issuing bank to obtain funds that have been paid to you for a transaction to be credited back to the shopper.
The shopper’s bank will usually contact your merchant bank to notify them of the chargeback claim, your bank will then get in touch with you to notify you of the chargeback and any action they expect you to take to resolve this.
Chargebacks can be raised for a number of reasons. Usually a chargeback request is raised by the shopper or their bank due to fraud, or a dispute with the business they have purchased from.
The most common causes of a chargeback are:
- Fraud – The shopper has not made the purchase and their card details have been used without their permission.
- Dispute – The shopper and your business are in dispute over delivery, product, refunds, or any aspects of the order and they wish to have the funds returned to them.
You will always be notified by your bank that a chargeback has been requested, and given an opportunity to address this.
Once your bank has been informed about the chargeback request it will contact you to either credit the funds back to the shopper directly, or to challenge the chargeback claim.
You will then be given an opportunity to resolve the chargeback claim directly with your bank, or the shopper.
If the chargeback claim is successful your bank will debit the funds equal to the amount of the chargeback and credit them to the shopper.
Ultimately you are. We offer a number of fraud prevention tools that can be used to limit the amount of risk your company is exposed to.
If a chargeback claim is made against your business the responsibility of the chargeback lies with your business unless successfully challenged by your business.
We can help you protect your business against the risk of a chargeback, but we are not responsible for any claims made against your business.
When you sign up for an account with us, you are given a number of fraud prevention tools as standard that can be used to reduce the amount of risk your company is exposed to, and in turn limit the risk of chargebacks.
They are:
- Featurespace
- Address, postcode, and card security code checks
- 3-D Secure authorisation
By using these tools you will be able to run your shoppers through fraud prevention during the transaction, and if they do not meet the requirements you have in place the transaction will be rejected.
We aren’t involved in the chargeback process at any stage.
If you receive a chargeback you should resolve this directly with your merchant bank.
The first thing you will need to do is access your Sage 50c Accounts software, select Modules, followed by Products.
You will then be taken to the products section within your Sage 50c Accounts software.
Now that you have reached the product section of your accounts software you will be able to go through the steps needed to create the product.
Select new product from the list of options down the left of your screen, this will launch the new product wizard for you.
On the first screen you will be able to enter the basic details of the product you would like to create, such as the code (which will be used within your basket field with Opayo), and the description of the product.
The second screen within the product wizard allows you to specify the cost of the item, the item type, and the tax details.
Moving onto the third screen you will be able to specify the details of the item when purchasing for your business, and set stock level thresholds, and purchase order details.
Upon completing the third step you will be able to finalise the product and decide if you would like to post an opening balance for the item.
After you have created the product you will be able to reference this within your basket field when processing a transaction through your website.
By doing this your accounts software will be able to identify the item purchased when downloading the transaction and deduct this from your stock within your Sage 50c product.
Have a look at our adding product codes to your basket field for more information.
The version of your Sage 50c Accounts is very important to confirm that your accounts package can link with our systems.
If you are using Sage 50c Accounts; you can use the below list to see if your version is able to link with Opayo.
|
|
Mail Order payments and reconciliation |
Invoice Payments and reconciliation |
E-commerce payments and reconciliation |
Stock management reconciliation |
|---|---|---|---|---|
|
Version 14 (v2008) |
X |
- |
- |
- |
|
Version 15 (v2009) |
X |
- |
- |
- |
|
Version 16 (v2010) |
X |
X |
- |
- |
|
Version 17 (v2011) |
X |
X |
X |
X |
|
Version 18 (v2012) |
X |
X |
X |
X |
|
Version 19 (v2013) |
X |
X |
X |
X |
Version 14 (v2008)
Mail Order payments and reconciliation
X
Invoice Payments and reconciliation
-
E-commerce payments and reconciliation
-
Stock management reconciliation
-
Version 15 (v2009)
Mail Order payments and reconciliation
X
Invoice Payments and reconciliation
-
E-commerce payments and reconciliation
-
Stock management reconciliation
-
Version 16 (v2010)
Mail Order payments and reconciliation
X
Invoice Payments and reconciliation
X
E-commerce payments and reconciliation
-
Stock management reconciliation
-
Version 17 (v2011)
Mail Order payments and reconciliation
X
Invoice Payments and reconciliation
X
E-commerce payments and reconciliation
X
Stock management reconciliation
X
Version 18 (v2012)
Mail Order payments and reconciliation
X
Invoice Payments and reconciliation
X
E-commerce payments and reconciliation
X
Stock management reconciliation
X
Version 19 (v2013)
Mail Order payments and reconciliation
X
Invoice Payments and reconciliation
X
E-commerce payments and reconciliation
X
Stock management reconciliation
X
For Sage 50c Essentials (formally Sage Instant Accounts) users you will be able to link with our systems if you are using the following versions.
|
|
Mail Order payments and reconciliation |
Invoice Payments and reconciliation |
E-commerce payments and reconciliation |
Stock management reconciliation |
|---|---|---|---|---|
|
Version 14 |
X |
- |
- |
- |
|
Version 15 |
X |
- |
- |
- |
|
Version 16 |
X |
X |
- |
- |
|
Version 17 |
X |
X |
X |
X |
|
Version 18 |
X |
X |
X |
X |
Version 14
Mail Order payments and reconciliation
X
Invoice Payments and reconciliation
-
E-commerce payments and reconciliation
-
Stock management reconciliation
-
Version 15
Mail Order payments and reconciliation
X
Invoice Payments and reconciliation
-
E-commerce payments and reconciliation
-
Stock management reconciliation
-
Version 16
Mail Order payments and reconciliation
X
Invoice Payments and reconciliation
X
E-commerce payments and reconciliation
-
Stock management reconciliation
-
Version 17
Mail Order payments and reconciliation
X
Invoice Payments and reconciliation
X
E-commerce payments and reconciliation
X
Stock management reconciliation
X
Version 18
Mail Order payments and reconciliation
X
Invoice Payments and reconciliation
X
E-commerce payments and reconciliation
X
Stock management reconciliation
X
Yes, if you have an older version of Sage 50c Accounts you will need to first upgrade your current accounts software to a newer version.
Once upgraded, you will then be able to link your Sage 50c Accounts product with our systems.
If you would like to upgrade your Sage 50c Accounts product you will simply need to contact the Sage 50c Sales team on 0800 33 66 33.
The sales team will be able to help you upgrade your accounts software and enable you to use invoice payments and mail order transactions.
Account reference
What is an account reference and where to find this
Invoicing
When will you receive your invoice and how to pay
Cancel account
Thinking about cancelling your account, find out the next steps to take
On this page
- Sage business cloud
- Uploading your invoice templates
- Process an Invoice Payment transaction
- Items not deducting from your stock
- Delivery charge in your basket
- Activating Opayo in Sage Instant Accounts
- Practice Data
- Customised Invoices
- Currencies with your Merchant Number
- Chargebacks and you
- Adding products to your Sage 50c accounts
- What versions of Sage 50 Accounts work with Opayo?
- Related articles
Elavon Terms of Service UK
Domestic and Multinational Customers
UK Operating Guide
The point-of-sale procedures
Opayo Merchant Terms & Conditions
(Opayo gateway only)

